Your Amazon Purchase Today

Saturday, 1 October 2016

How to create a Customer In Oracle

How to create a customer in Oracle

In this post we will se how to create a customer in oracle receivables application.

Customers are created in oracle receivables modules.

Below I have shown the detailed steps on "how to create a customer in oracle receivables application"

Steps to create customer in oracle application

Step 1:

Navigate to Responsibility: Account Receivable->Customer->Standard

Following Window will open up

How to create a Customer In Oracle

How to create a customer In Oracle application


Step 2:

Now Click on Create

A Customer can be divided as organization or standard.

Enter organization name this will be the customer name

Enter a profile class for that customer

To create sites for the customer click on create button 


How to create a Customer In Oracle

How to create a customer In Oracle receivables

Step 3:

After clicking on create  button new window will open up

Enter the details like country ,Address line 1 and postal code


How to create a Customer In Oracle


Enter the operating unit for this customer

Select a category like whether it is motorist or Insurance etc

Select the option auto apply credit memos ,billing cycle ,print option and business unit for the customer 

How to create a Customer In Oracle

How to create a customer In Oracle application


Step 4:

Click on the apply button

In last customer will appear like this 


How to create a Customer In Oracle


By following the above steps you can easily create a customer in oracle receivable.

How to create a customer In Oracle application | Creating a customer in oracle | Customer in Oracle receivables

Thursday, 29 September 2016

Important Queries for oracle receivable, Payables


Important Queries for oracle receivable, Payables

Below are the few important queries which are used in oracle

Important Queries


1.Below query will fetch all the responsibilities attached to a user


Select   fu.user_name, 
            fr.responsibility_name, 
            furg.START_DATE, furg.END_DATE
from   fnd_user_resp_groups_direct furg, fnd_user fu,                                  fnd_responsibility_tl fr
where  fu.user_name = :user_name
and      furg.user_id = fu.user_id
and      furg.responsibility_id = fr.responsibility_id
and      fr.language = userenv('LANG')


2.Query to find all the users which get updated in last one month 


select vs.name,a.*
from(
SELECT
     fuser.description
    ,fuser.USER_NAME USER_NAME
    , fuser.employee_id
    ,fuser.start_date
    ,fuser.end_date
    ,papf.full_name
    --,frt.RESPONSIBILITY_ID RESPONSIBILITY_ID
    --,frt.RESPONSIBILITY_NAME RESPONSIBILITY
    ,fuser.creation_date creation_date
    ,fuser.last_update_date last_updated
    ,(select count(1) from FND_USER_RESP_GROUPS furg, FND_RESPONSIBILITY_TL frt where frt.RESPONSIBILITY_ID = furg.RESPONSIBILITY_ID and fuser.USER_ID = furg.USER_ID AND frt.LANGUAGE = 'US') resp_count
    ,(select count(1) from wf_user_role_assignments_v furg, FND_RESPONSIBILITY_TL frt where 'FND_RESP'||frt.application_id||':'||frt.RESPONSIBILITY_ID = furg.ROLE_name AND frt.LANGUAGE = 'US' and fuser.USER_name = furg.USER_name and furg.creation_date>=sysdate-30) resp_added_in_last_month_count
FROM
    FND_USER fuser
    --, FND_USER_RESP_GROUPS furg
    --, FND_RESPONSIBILITY_TL frt
    , (select full_name,person_id from per_all_people_f papf1 where sysdate between papf1.effective_start_date and papf1.effective_end_date) papf
    --,wf_user_role_assignments_v wura
WHERE
    1=1
    --and wura.user_name=fuser.user_name
    --fuser.USER_ID = furg.USER_ID
    --AND frt.RESPONSIBILITY_ID = furg.RESPONSIBILITY_ID
    --AND frt.LANGUAGE = 'US'
    --and fuser.last_update_date>=sysdate-30
    and fuser.last_update_date>=sysdate-30
    and papf.person_id = fuser.employee_id(+)
    -- AND frt.LANGUAGE = 'US'   
) a, v$database vs
where a.resp_added_in_last_month_count <> 0 or a.end_date is not null
order by a.user_name


3.Query to find the count( number of ) invoices created between particular date and time 


select trunc(creation_date) start_date,
       to_char(creation_date, 'hh24:mm') START_TIME,
       count(*) total,
       sum(case when nvl(attribute15,'PAPER') = 'EDI'  and trx_number not like '%CR' then 1 else 0 end) EDI_INVOICES,
       sum(case when nvl(attribute15,'PAPER') = 'PAPER' and trx_number not like '%CR' then 1 else 0 end) PAPER_INVOICES,
       sum(case when trx_number like '%CR' then 1 else 0 end) CREDIT_MEMO
from ra_customer_trx_all 
where creation_date between to_date('2016-05-01 00:00:00','YYYY-MM-DD HH24:MI:SS') and to_date('2016-05-02 23:59:59','YYYY-MM-DD HH24:MI:SS')
group by creation_date,to_char(creation_date, 'hh24:mm:ss')
order by start_time

Monday, 26 September 2016

How to setup Transaction Types In Oracle Receivables

How to setup Transaction Types In Oracle Cloud Receivables


In this blog we will see what is a transaction types in oracle and how to setup transaction types in oracle receivables.


Transaction Types setup in Oracle receivables:

Transaction types in oracle are used to default tax, freight, creation sign , receivables information etc on the transaction.

Transaction types in oracle receivables also checks whether your transaction entries will update your customers' balances and whether Receivables will posts these transactions to your general ledger or not.

In oracle you can associate transaction types with the  invoice sources in the Transaction Sources window . This will speed data entry while creating transaction and credit transaction.

There are two predefined transaction types in oracle receivables:


1. Invoice

2. Credit Memo.

Detailed Steps to create Transaction Types in oracle receivables


1.      Navigate to the Receivables Responsibility >Setup >Transactions >Transaction Types

2.      In operating Unit field by default will have current operating unit.

3.      Enter the unique Name and Description of the transaction type.
     
4.      Select a Class for the transaction type.


How to setup Transaction Types In Oracle Receivables

How to setup Transaction Types In Oracle Receivables

Below are the seeded classes available in oracle

1.   Invoice
2.   Chargeback
3.   Credit Memo
4.   Debit Memo
5.   Deposit
6.   Guarantee

For the case of credit memo 

5. Set Open Receivable is to Yes,

Customer balances will be updated each time when we create a debit memo, credit memo, chargeback, or on-account credit with this transaction type in receivables. these will also be included in the standard aging and collection processes in receivables.

6.Select the Post to GL checkbox

If this check box is selected you will be able to post transactions with this type to general ledger.This box should always be checked if the class is Deposit or Guarantee.

7.Select Print. 
     
This can overridden while entering transactions in transaction window in receivables.

8. Select Transaction Status of From the LOV. The values available are open, Closed, Pending, or Void. 

9.Select the Allow Freight box.

This will allow freight to be entered for transactions having transaction type

10.Select the Tax Calculation box.

Tax calculation will be performed only for the transactions which will have this transaction type and this check box is selected. If this checkbox is not selected then receivables will not calculate the tax for the transaction with this transaction type.

11.Select Creation Sign.

The default values selected in this is Positive Sign for transaction types having class of either Guarantee or Deposit. If we use Cash Basis accounting in that case Transaction's creation sign should be Positive Sign, Negative Sign, or Any Sign. This filed can not be updated once selected for any transaction types.
        
12.Check the Natural  Application Only box. This cannot updated once saved this transaction type.

13.Enter the account values like receivable account , freight account etc .these account will be defaulted when we create any transaction for this transaction type.


How to setup Types In Oracle|Transaction Types setup in oracle|Transaction Types In Oracle Receivable


Tuesday, 6 September 2016

Collectors in oracle receivable

What is Collectors in oracle receivables 

In this blog we will see what is collectors in oracle receivables and how to create collectors in oracle receivables

What is Collectors in oracle:


Receivables allows you to create collectors and you can them to a specific profile class or to a customer's credit profile class. After you assign a collector a to profile class, that collector becomes the collector for customers which are assigned with that profile class


Collector in oracle is that the one who is chargeable for collection of amounts. The Collectors are going to be appointed to a profile class or to a customer's credit profile class. Once you assign a collector to a profile class, that collector becomes the collector for all customers appointed that profile category. 

 Steps to create collectors in oracle receivables:

1. Go to the Collectors window.

2. Enter the Name and Description of the collector. 

3. Enter the other details as well like telephone number, correspondence address . If you want you can use this information on your dunning letters as well.

4. Save your work.

Navigation for Collector in Oracle Receivables

Go to Navigator>Setup>Collections>Collector


Collectors in oracle receivable

2. The collection window will open up


Collectors in oracle receivable

Collectors in oracle receivable | Defining Collectors in oracle receivable 

Sunday, 4 September 2016

How to create chargeback in oracle receivables

How to create Chargeback in oracle receivables


In this post we will see what is chargeback in oracle receivables and how to create chargeback in oracle receivables 


Chargeback in receivables
 is created when you want to close original invoice which customer has paid and crate a new invoice with left amount that customer has to pay yet.

Lets understand chargeback with an example in oracle receivables


Suppose a customer has purchase an item of INR 500 and he has paid INR 475 then we will  create chargeback of INR 25 in receivables for that customer and close the original invoice

Chargeback Cycle in oracle receivables:


• First we will Create Invoice for the items that the customer has bought from us.

•  After receiving the payment from customer, create will create a receipt

•  This receipt will be applied to the invoice

•  Now we will Create a Chargeback for the remaining amount which customer has to pay.

•  Now when  the customer pays the remaining amount ( at alter point of time), we will create a receipt and  apply it to the chargeback.

Lets see how to create chargeback in oracle receivables step wise


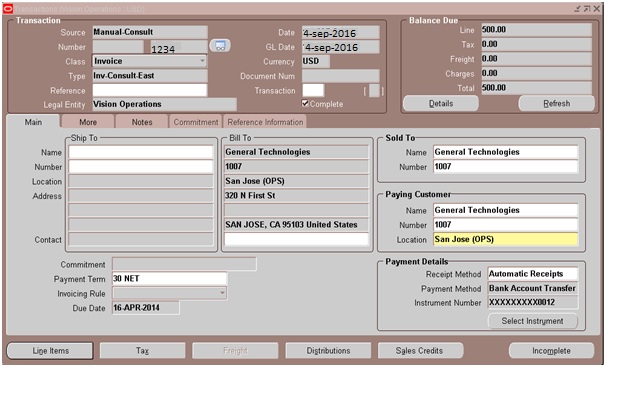
1. Invoice Creation: As Assumed customer bought a camera worth INR 500 from us. We will create invoice for INR 500 for that customer in account receivabels.

Nvigation : Receivables responsibilty>Transaction>transaction

How to create chargeback in oracle receivables

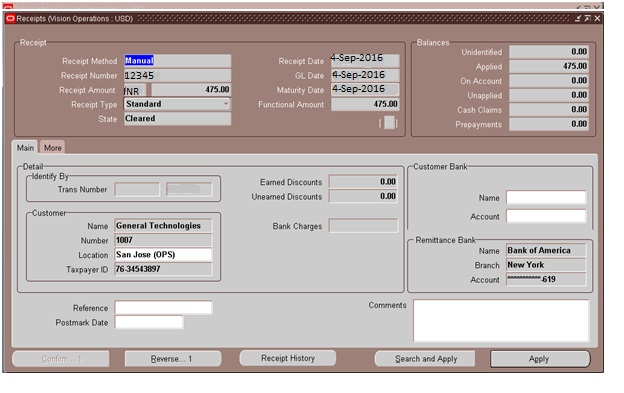
2. Receipt creation: Now customer has sent payment of INR 475 instead of INR 500. Once we receive the payment, we will create a receipt for INR 475 in receivables.

Navigation for creating a receipt: Receivables responsibility > Receipts > Receipts

Enter the information as below:

Receipt Method: Choose one of the method form the drop down lists. In this case we have selected manual.

Receipt Number: Here enter the receipt number. This should be a unique number.

Receipt amount: This will be the amount paid by customer

Save it. A receipt will be created in the system.

How to create chargeback in oracle receivables

How to create chargeback in oracle receivables


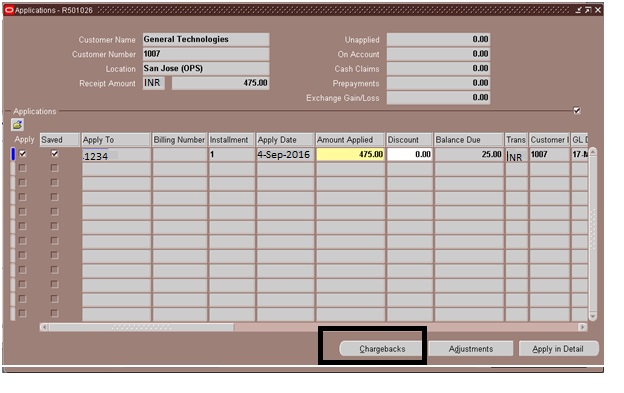
3.  Application : Apply the receipt to the receivables invoice against which we have received the payment.

To apply the receipt to a invoice, click on Apply button on the lower right hand side of the receipt.

Enter the invoice number on which you want to apply the receipt in Apply to column and save it. (Apply check box is checked before saving the work)

How to create chargeback in oracle receivables
After applying the receipt to the invoice, the balance on the invoice will remain INR 25.

4. Create Chargeback in oracle receivables


Now the original invoice is closed and the customer has remaining balance as 25INR. We will have to create a chargeback in receivables for the customer.

Navigate to Receipts and query our receipt which we created earlier and click on Apply button

Chargeback in oracle receivables

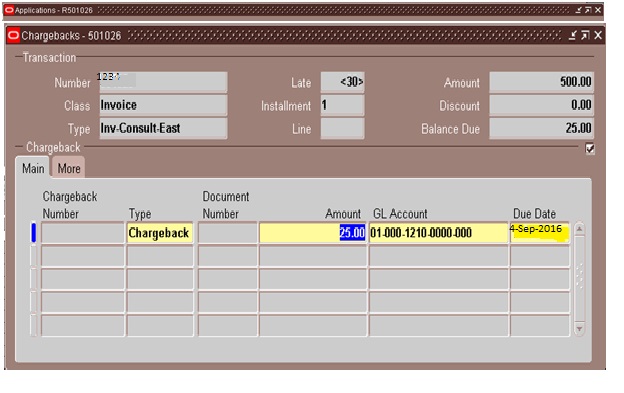
Now click on the Chargebacks button available


Enter the details like transaction Type and the Amount for this chargeback. By default the chargeback amount is the remaining amount of the transaction.

Chargeback in oracle receivables
Save the work. On saving, the chargeback number will be generated automatically.

You can Check the balance on invoice as well, it will be INR 0

Chargeback in oracle receivables

How to create chargeback in oracle receivables

How to create chargeback in oracle receivables

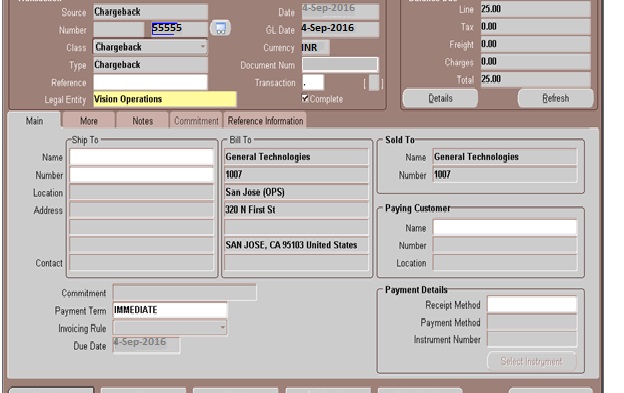
Now try to query the Chargeback. You will see there is  balance of INR25, which the customer has to pay.

Chargeback in oracle receivables


Chargeback in oracle receivables | How to create Chargeback in oracle receivables

Tuesday, 23 August 2016

Imortant Queries

1.Query to find Schedule of any concurrent program

SELECT fcr.request_id
     , fcpt.user_concurrent_program_name|| NVL2(fcr.description, ' (' || fcr.description || ')', NULL) conc_prog
     , fu.user_name requestor
     , fu.description requested_by
     , fu.email_address
     , frt.responsibility_name requested_by_resp
     , trim(fl.meaning) status
     , fcr.phase_code
     , fcr.status_code
     , fcr.argument_text "PARAMETERS"
      , TO_CHAR(fcr.request_date, 'DD-MON-YYYY HH24:MI:SS') requested
     , TO_CHAR(fcr.requested_start_date, 'DD-MON-YYYY HH24:MI:SS') requested_start  
     , TO_CHAR((fcr.requested_start_date), 'HH24:MI:SS') start_time
     , DECODE(fcr.hold_flag, 'Y', 'Yes', 'N', 'No') on_hold
     , CASE
          WHEN fcr.hold_flag = 'Y'
             Then Substr(
                    fu.description
                  , 0
                  , 40
                 )
       END last_update_by
     , CASE
          WHEN fcr.hold_flag = 'Y'
             THEN fcr.last_update_date
       END last_update_date
     , fcr.increment_dates
     , CASE WHEN fcrc.CLASS_INFO IS NULL THEN
        'Yes: ' || TO_CHAR(fcr.requested_start_date, 'DD-MON-YYYY HH24:MI:SS')
       ELSE
        'n/a'
       END run_once
     , CASE WHEN fcrc.class_type = 'P' THEN
        'Repeat every ' ||
        substr(fcrc.class_info, 1, instr(fcrc.class_info, ':') - 1) ||
        decode(substr(fcrc.class_info, instr(fcrc.class_info, ':', 1, 1) + 1, 1),
               'N', ' minutes',
               'M', ' months',
               'H', ' hours',
               'D', ' days') ||
        decode(substr(fcrc.class_info, instr(fcrc.class_info, ':', 1, 2) + 1, 1),
               'S', ' from the start of the prior run',
               'C', ' from the completion of the prior run')
       ELSE
         'n/a'
       END set_days_of_week
       , CASE WHEN fcrc.class_type = 'S' AND instr(substr(fcrc.class_info, 33),'1',1) > 0 THEN
          'Days of week: ' ||
                  decode(substr(fcrc.class_info, 33, 1), '1', 'Sun, ') ||
                  decode(substr(fcrc.class_info, 34, 1), '1', 'Mon, ') ||
                  decode(substr(fcrc.class_info, 35, 1), '1', 'Tue, ') ||
                  decode(substr(fcrc.class_info, 36, 1), '1', 'Wed, ') ||
                  decode(substr(fcrc.class_info, 37, 1), '1', 'Thu, ') ||
                  decode(substr(fcrc.class_info, 38, 1), '1', 'Fri, ') ||
                  decode(substr(fcrc.class_info, 39, 1), '1', 'Sat ')
         ELSE
           'n/a'
         end  days_of_week
  FROM fnd_concurrent_requests fcr
     , fnd_user fu
     , fnd_concurrent_programs fcp
     , fnd_concurrent_programs_tl fcpt
     , fnd_printer_styles_tl fpst
     , fnd_conc_release_classes fcrc
     , fnd_responsibility_tl frt
     , fnd_lookups fl
 WHERE fcp.application_id = fcpt.application_id
   AND fcr.requested_by = fu.user_id
   AND fcr.concurrent_program_id = fcp.concurrent_program_id
   AND fcr.program_application_id = fcp.application_id
   AND fcr.concurrent_program_id = fcpt.concurrent_program_id
   AND fcr.responsibility_id = frt.responsibility_id
   AND fcr.print_style = fpst.printer_style_name(+)
   AND fcr.release_class_id = fcrc.release_class_id(+)
   AND fcr.status_code = fl.lookup_code
   AND fl.lookup_type = 'CP_STATUS_CODE'
   AND fcr.phase_code = 'P'
   AND 1=1

Order By Fu.Description, Fcr.Requested_Start_Date Asc;

2.Query to find the responsibilities to which concurrent program program is attached


SELECT frt.responsibility_name, frg.request_group_name,
    frgu.request_unit_type,frgu.request_unit_id,
    fcpt.user_concurrent_program_name
    FROM fnd_Responsibility fr, fnd_responsibility_tl frt,
    fnd_request_groups frg, fnd_request_group_units frgu,
    fnd_concurrent_programs_tl fcpt
    WHERE frt.responsibility_id = fr.responsibility_id
    AND frg.request_group_id = fr.request_group_id
    AND frgu.request_group_id = frg.request_group_id
    AND fcpt.concurrent_program_id = frgu.request_unit_id
    AND frt.LANGUAGE = USERENV('LANG')
    AND fcpt.LANGUAGE = USERENV('LANG')
    AND fcpt.user_concurrent_program_name = 'Your Program Name'
    ORDER BY 1,2,3,4

3.Query to find any program detail 

SELECT   DISTINCT fcp.user_concurrent_program_name "Concurrent Program Name",
                  fcp.description "Concurrent Program Description",
                  fef.executable_name"Executable Name",fef.description "Executable Description",
                  fef.execution_file_name "Procedure Name"
             FROM fnd_executables_form_v fef,
                  fnd_concurrent_programs_vl fcp
            WHERE fcp.APPLICATION_ID=fef.APPLICATION_ID
              AND fef.EXECUTABLE_ID=fcp.EXECUTABLE_ID
           --AND fef.executable_name='XX_EXECUTABLE'---Youer Executable Name
              AND fcp.user_concurrent_program_name like 'Belron GL%'--Your Consurrent Program name


AutoInvoice Grouping Rules in Oracle

AutoInvoice Grouping Rules In Oracle

In this post we will see Autoinvoice Grouping Rules in Oracle in detail

AutoInvoice Grouping Rules in oracle


Autoinvoice grouping rules are used to group the lines in Invoices, debit memo and credit memo in oracle. Autoinvoice grouping rules in oracle determine how lines will appear in a invoice or a credit/debit memo.


Steps to create Autoinvoice Grouping Rules in oracle:


Responsibility: Navigate to Receivables Manager

Go to Setup then -> Transactions  then -> Auto Invoice then -> Grouping Rules


AutoInvoice Grouping Rules In Oracle

AutoInvoice Grouping Rules In Oracle


If you are using line ordering rules then you have to select line ordering rules as well. If we do not give any optional Grouping Characteristics, Autoinvoice will match it to mandatory characteristics. Oracle provides options to assign Optional characteristics for Invoices, Credit Memos and Debit Memos.


AutoInvoice Grouping Rules in Oracle

AutoInvoice Grouping Rules In Oracle receivables


If you want to provide optional attributes for all invoices, debit memos and credit memos, You need to first select the class as invoice and then give the group by rules , similarly place the cursor on class use the down arrow to define attributes for other classes(Credit Memo and Debit Memo) as well. 


AutoInvoice Grouping Rules in Oracle|AutoInvoice Grouping Rules|| Autoinvoice grouping rules 


Monday, 1 August 2016

How to Process Refund In Account payables oracle

How to process refund in oracle account payables

In this post we will see how we process Refund in Accounts payables oracle Account payables

Below are the steps shown  to process refund in oracle payables

Lets take few Assumptions: A credit Memo is already available against a supplier and is also available for creating Refund from the Supplier

Step 1) 

(a) Navigate to responsibility -> Account Payable.

(b) Go to the Payments screen Following the path Payments-> Entry>Payments

Step 2) 

Payment workbench will open up,

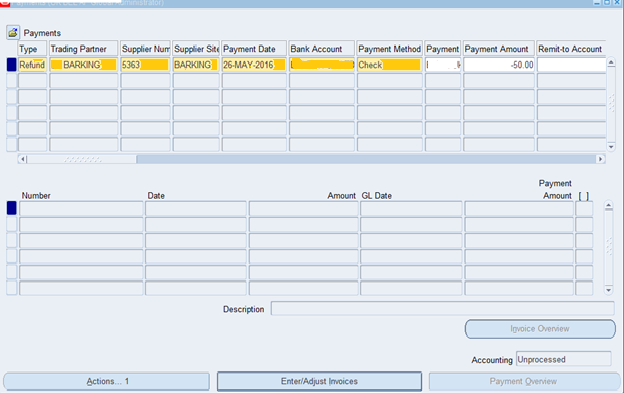
In ‘Type’  filed Select  ‘Refund’  and also select values in all required fields(highlighted in yellow)

Refund in Account payable oracle APRefund In Account payable oracle


In Payment amount(Enter - amount only )(as this is a refund)


Refund in Account payables oracle

Refund in Accounts payables oracle AP


   Click on the button ‘Enter/Adjust Invoices’

Refund in Accounts payables oracle AP
Refund in Accounts payables oracle


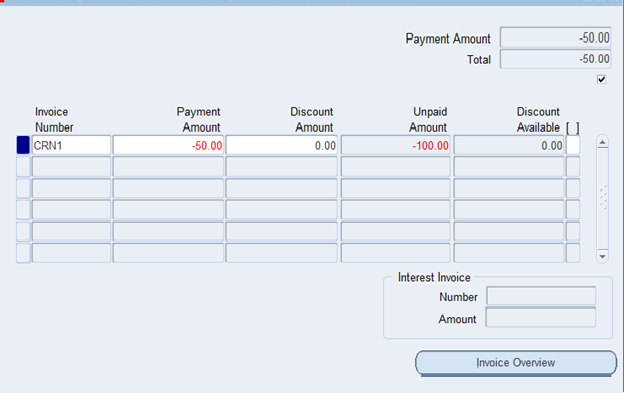
Select the ‘Invoice Number’  against which refund has to be raised ( this will be the Credit Memo which was already created by supplier) 


Refund In Account payable oracleRefund In Accounts payables oracle AP

     Click ‘Save’, the payment is completed.

Refund In Accounts payables oracle


Refund In Accounts payables oracle|Refund In Oracle|Process Refund In Accounts payables AP

Thursday, 28 July 2016

How to void a Payment In Oracle

How to Void a Payment in Oracle Payables

In this blog we will see how to void a payment in oracle payables in detail.

We are allowed to cancel or void a payment which we have made to suppliers unless those are not cleared from the bank. If the Payment is cleared from the bank than in that case we should not void or cancel a payment as this will cause the reconciliation issues in the system.


Following are the detailed steps show on "How to void payment in oracle payables".


Step 1

Go to Oracle Account Payable responsibility

Then

Payments > Entry > Payment 

Step 2:

Query your Payment ( this should be the payment which you want to void ) in the following window by payment date/Supplier Number etc.


Click on Actions…1

(detailed screenshots on "how to void a payment in oracle")How to void a Payment in oracle


How to void a payment In Oracle payablesHow to void a Payment In Oracle


Step 3:

A). Click on Action..1 button

B). Select Void check box

C). Select date and GL date

D). In Invoice action: Select what action to take on invoice after payment is void. Like Keep it on Hold Or Cancel  or None

E). Click Ok

D). Again click ok in the wizard opened

                                                           (detailed screenshots on "how to void a payment in oracle")

How to void a Payment in oracle
How to void a Payment In Oracle payablesHow to void a Payment In Oracle


Using above steps you can easily void a payment in oracle.


How to void a Payment oracle payables| How to void a Payment in oracle application |Void a Payment 


Sunday, 17 July 2016

How To AutoPost Journals in oracle

How to AutoPost Journals in oracle


In this post we will see how to autopost journals in oracle by creating an autopost criteria set

There are cases when we need to post journal in a specific order because one transaction needs to be completed before another transaction commits. In Oracle, we have a option called as “AutoPost criteria set”.

Using AutoPost criteria set we can automatically post journal batches that meets specific criteria. After defining an Auto Post criteria set, we run the Auto Post program which selects and post the journal batches that meet the Auto post criteria set defined by us. We can also schedule the Auto Post program to run it at specific time and perform posting of journals


How To AutoPost Journals  in oracle 

Below are the steps to setup AutoPost criteria set in oracle fusion to Autopost journals in oracle

How To AutoPost Journals  in oracle

How to autopost journals in oracle


How To AutoPost Journals  in oracle

                                                                                                          How to autopost journals in oracle

1.Enter the Unique name for the autopost criteris set. This will be used while running or scheduling the the
Autopost program.

2. Select the checkbox enabled.

3. The options provided in the “Posting submission options”  are used to specify that journals and journal sets are posted based on the priority.

   Submit All Priorities in Order: If you select this option the the journals are submitted as of your Auto Post priorities in the same Auto Post run. 

   Submit Only Priorities with Batches in Order: If you select this example Autopost will select the journals of specified Number of Priorities in the same Auto Post run.

4. Enter the Auto post Criteria sets effective dates here.

5. The Priority field will have values from one to ninety nine. The journal with the priority no 1 are going to be processed initial and therefore the journal with the priority 99 are going to be processed at last. Ifwe assign same priority to multiple journal sources then they're going to be processed at the same time.


6.  Select the journal source from the Lov which you want to include in the Autopost criteria set.

7. Select the category, balance type, period for the journal. Balance type of the journal helps us in the identification of the type of transactions.

    if you select  “Actual”  means journal contains all types of transactions.

    if you select “Encumbrance” means journal contains those transactions that will be completed in near future.

     If you select  “Budget” means that the journal contains budget transactions for the organization.

    You can also select “ALL” also which means that journal can contain all of the above transactions

8. Fill the details and Save it .

How To Auto Post Journals in oracle

                                                                                                         How to autopost journals in oracle

Submit the AutoPost Program:


Once you have create the Auto post criteria set it can be submitted manually or automatically. Manual submission can done by selecting the submit button in the above screenshot. After you submit it you will request request id as  show below

How To Auto Post Journals in oracle

How To AutoPost Journals  in oracle 


In order to submit the journals for auto posting :  there is a  “Program – Automatic Posting” which need to be submitted.

This can achieved from the above screenshot by clicking on the “Schedule” button.

How To Auto Post Journals in oracle

Select the Auto post Criteria set  which we have created as above " Vision_Post_set" and schedule the program as your requirements.


How To Auto Post Journals |How To Auto Post Journals in oracle |Autopost criteria set in oracle||How to post entries in oracle apps|Program Automatic Posting|Automatic Posting


Tuesday, 5 April 2016

what is Credit memo and debit memo in oracle

Credit memo and Debit memo in Oracle


      What is Credit memo and debit memo in oracle Accounts payable


First of all We will see what is credit memo in oracle and debit memo in oracle payables.


Credit memo and debit memo in oracle both are used to reduce buyer liability in Payable . Therefore both are negative in amount .

Credit memo in oracle payables is generate by supplier . It will be in negative amount .


Debit memo in oracle payables is generated by buyer it will also be in negative amount.


Consider the following example

Suppose we have purchased 5 items from a supplier of 100$ .Now 3 items we received are in damaged state. Now if supplier sends you document which will show that some amount will be reduced form original amount as you don’t want damaged products ,that will be credit memo .It will be in negative amount and will be recorded as credit memo in oracle.

If instead of supplier, we are sending a document containing the detail of damaged goods then that will be debit memo in oracle.

In both the case our(buyer) liability will reduce.

What is Credit memo and debit memo in Oracle Account Receivables 


First of all We will see what is credit memo in oracle and debit memo in oracle receivables.


What is credit memo:


The functionality of credit memo will be same here in receivables same as payable. No difference it will in negative amount and will reduce the buyer liability but debit memo will function in opposite way.

What is debit memo:


Debit memo in receivables will increase the liability . It will be in positive amount .

Consider the following example

Suppose we have sold some 5 items of 100$ to some buyer. By mistake we have sent an invoice for 4 items only. Now we want the customer to pay for 5th item also. In that case we will send an Invoice
which will be called as debit memo to buyer. It will be in Positive amount and will be recorded as debit memo in oracle.


What is Credit memo in oracle |Debit memo in oracle|credit and debit memo in oracle|What is debit memo|what is debit memo in accounts payables|Difference between credit memo and debit memo|credit memo debit memo

Saturday, 2 April 2016

Payment Term Creation In Payables and Receivables Oracle apps

Payment term setup in Account Payables


In this post we will see how we create/setup payment term in oracle payable and receivables.

Payment terms are created to calculate the due date for a invoice.


Steps To Create/setup Payment Terms in payables


Navigation : Responsibility Payables Managers >go to Setup >Invoice >Payment Terms

Now here lets take an Example: 

We created a Payment Term – 15/45 Net 90

Explaining the above payment term : Supplier will offer you 15% of discount and if you pay the invoice in next 45 days. The total invoice amount is due in 90 days. In such case,  payment term will be setup 
as follows.

Payment Term Creation In Payables

Payment Term Creation In Payables


Payment term setup in Account Receivables


Responsibility: Receivables Manager
 
Navigation: Setup > Transactions > Payment Terms

The setup which is shown below is created for a payment term which has a due date  of 60 days from the transaction date. If the invoice is paid in 10 Days then we will give 2 Percent discount on the Invoice.


Payment Term setup In Payables and Receivables


Popular Posts